Planche Progression: How to Learn the Planche Step by Step
Learn the planche with every step the app uses, from pseudo planche to full planche: hold times for moving up, a weekly plan, a wrist warm-up and common mistakes.

The planche is one of the hardest holds in calisthenics and also one of the most plannable: every stage lengthens the lever a little, and you always know what comes next. This guide shows you every stage in the order you meet it in the Simple Calisthenics app, with concrete hold times, a weekly plan and a warm-up for your wrists.
What Is the Planche, and Why Is It So Hard?
The planche is a straight-arm static hold in which your body floats horizontally above the floor and only your hands touch the ground. It is the end point of the planche progressions and one of the most demanding bodyweight strength skills there is.
The front shoulder does most of the work. It is supported by the serratus anterior, which spreads your shoulder blades apart, and by the upper chest. Your core and glutes hold a hollow body position, and your biceps stabilize the locked elbows.
Three things make the planche hard:
- The lever. The further your feet are from your hands, the longer the lever and the more strength your shoulders need. The stages use exactly this: they lengthen the lever one step at a time.
- The lean. Your center of mass has to sit over your hands. Your shoulders travel far ahead of your wrists, and your wrists carry your bodyweight in deep extension.
- The tendons. Straight arms load the biceps tendon, elbows and wrists directly. A meta-analysis by Bohm, Mersmann and Arampatzis (2015) found that tendons respond mainly to high loads and adapt more slowly than muscle, with a trend toward larger effects in programs of 12 weeks or more.
Your proportions matter too: long arms relative to your legs need less lean and make the planche far easier, and so does a lower bodyweight. Measure your progress against yourself, not against others.
Planche Prerequisites: What You Need Before You Start
Pass four tests before you train the first planche stages. They show whether your pushing strength, body tension, shoulder blade control and wrists can keep up with the load.
| Test | Target | Why |
|---|---|---|
| Strict push-ups in a row | 20 reps | Base pushing strength |
| Hollow body hold | 30 seconds without arching | Body tension for the horizontal line |
| Push-up position with shoulder blades pushed apart | 30 seconds | Protraction under load |
| Loaded wrist warm-up | 3 minutes without pain | Tolerance for the lean |
These marks come from common coaching standards: FitnessVolt uses 20 strict push-ups as the first checkpoint, Daniel Hristov names a 20 to 30 second hollow body hold, and The Movement Athlete asks for 3 minutes of pain-free wrist prep. They show readiness, not a guarantee.
If you miss a test, you do not have to wait. The planche plank and pseudo planche half lean are easy enough to start with, and push-ups stay in your training anyway until planche push-ups replace them.
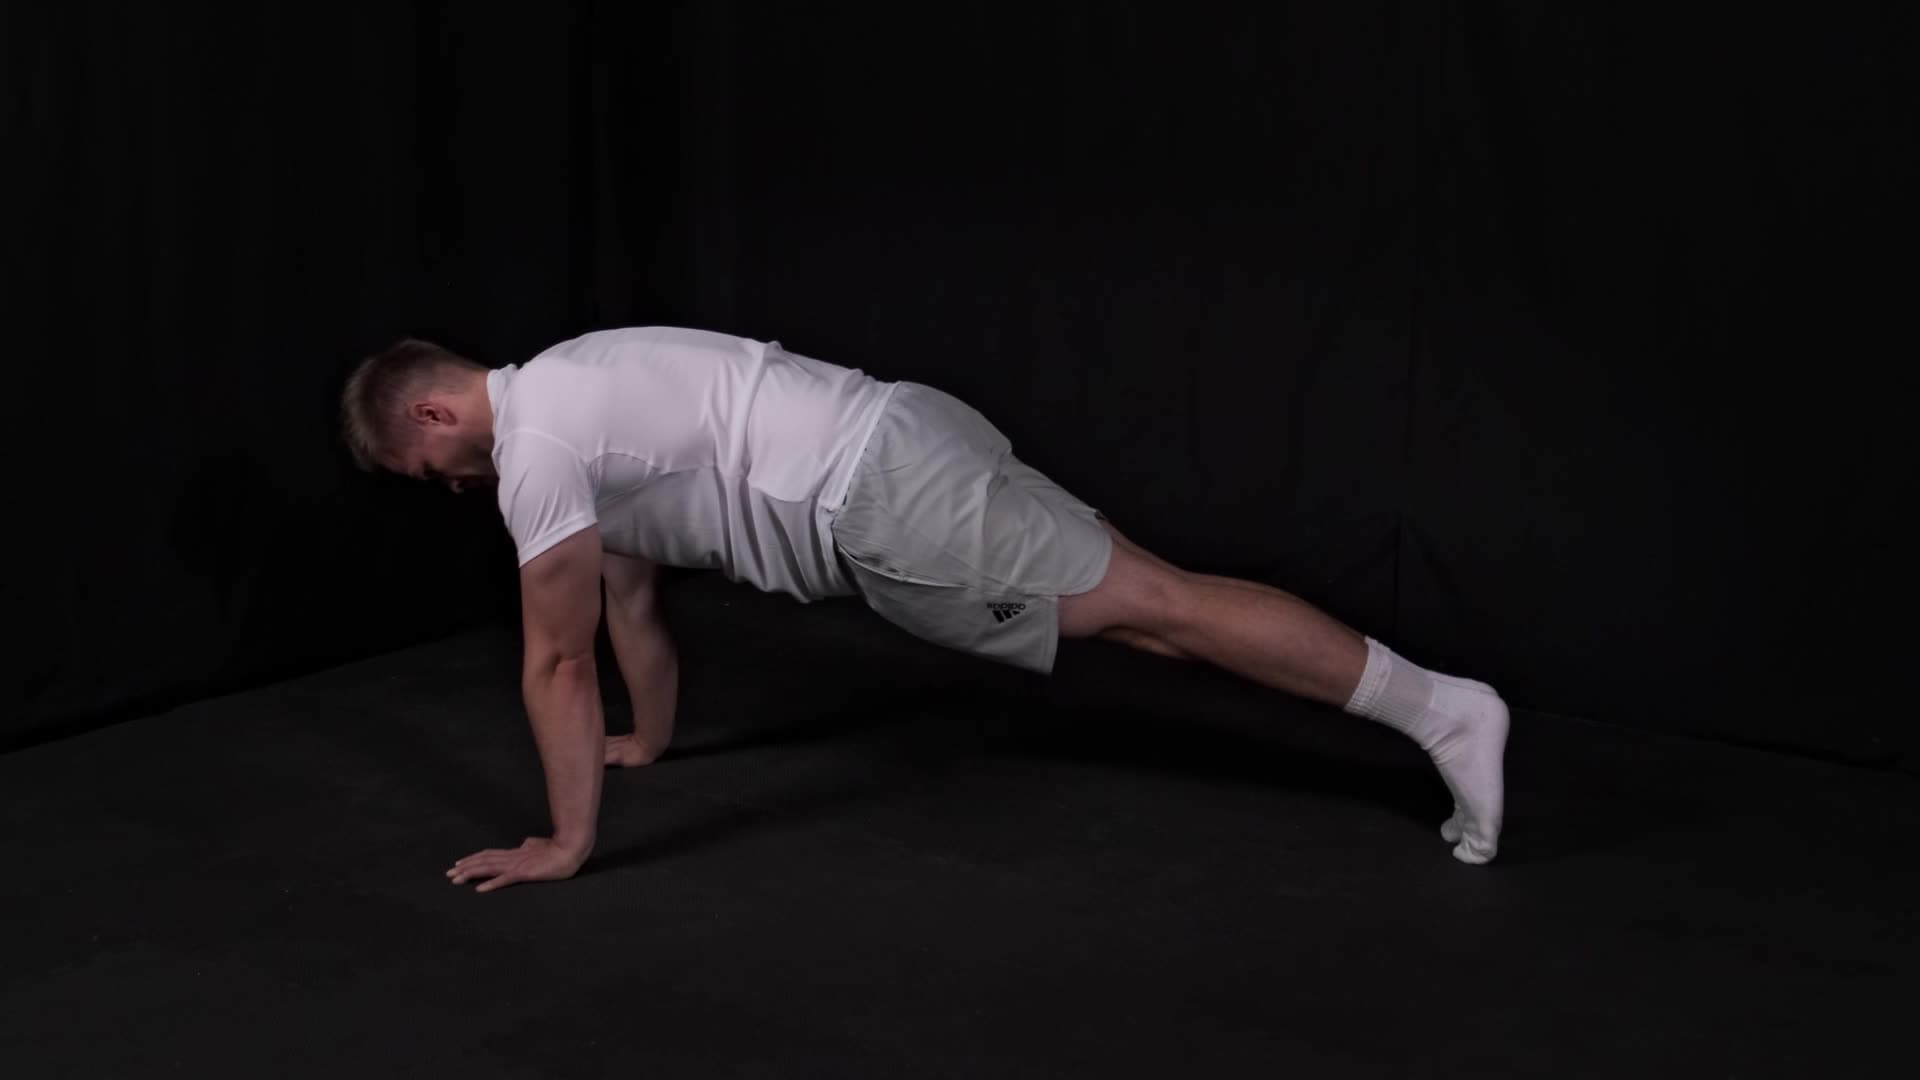
Progresje pompek
Utrzymuj prostą linię ciała. Nie pozwól biodrom opadać ani unosić się za wysoko
Train the hollow body as an exercise of its own until you can lock into it without thinking. That same tension carries into every planche stage later.
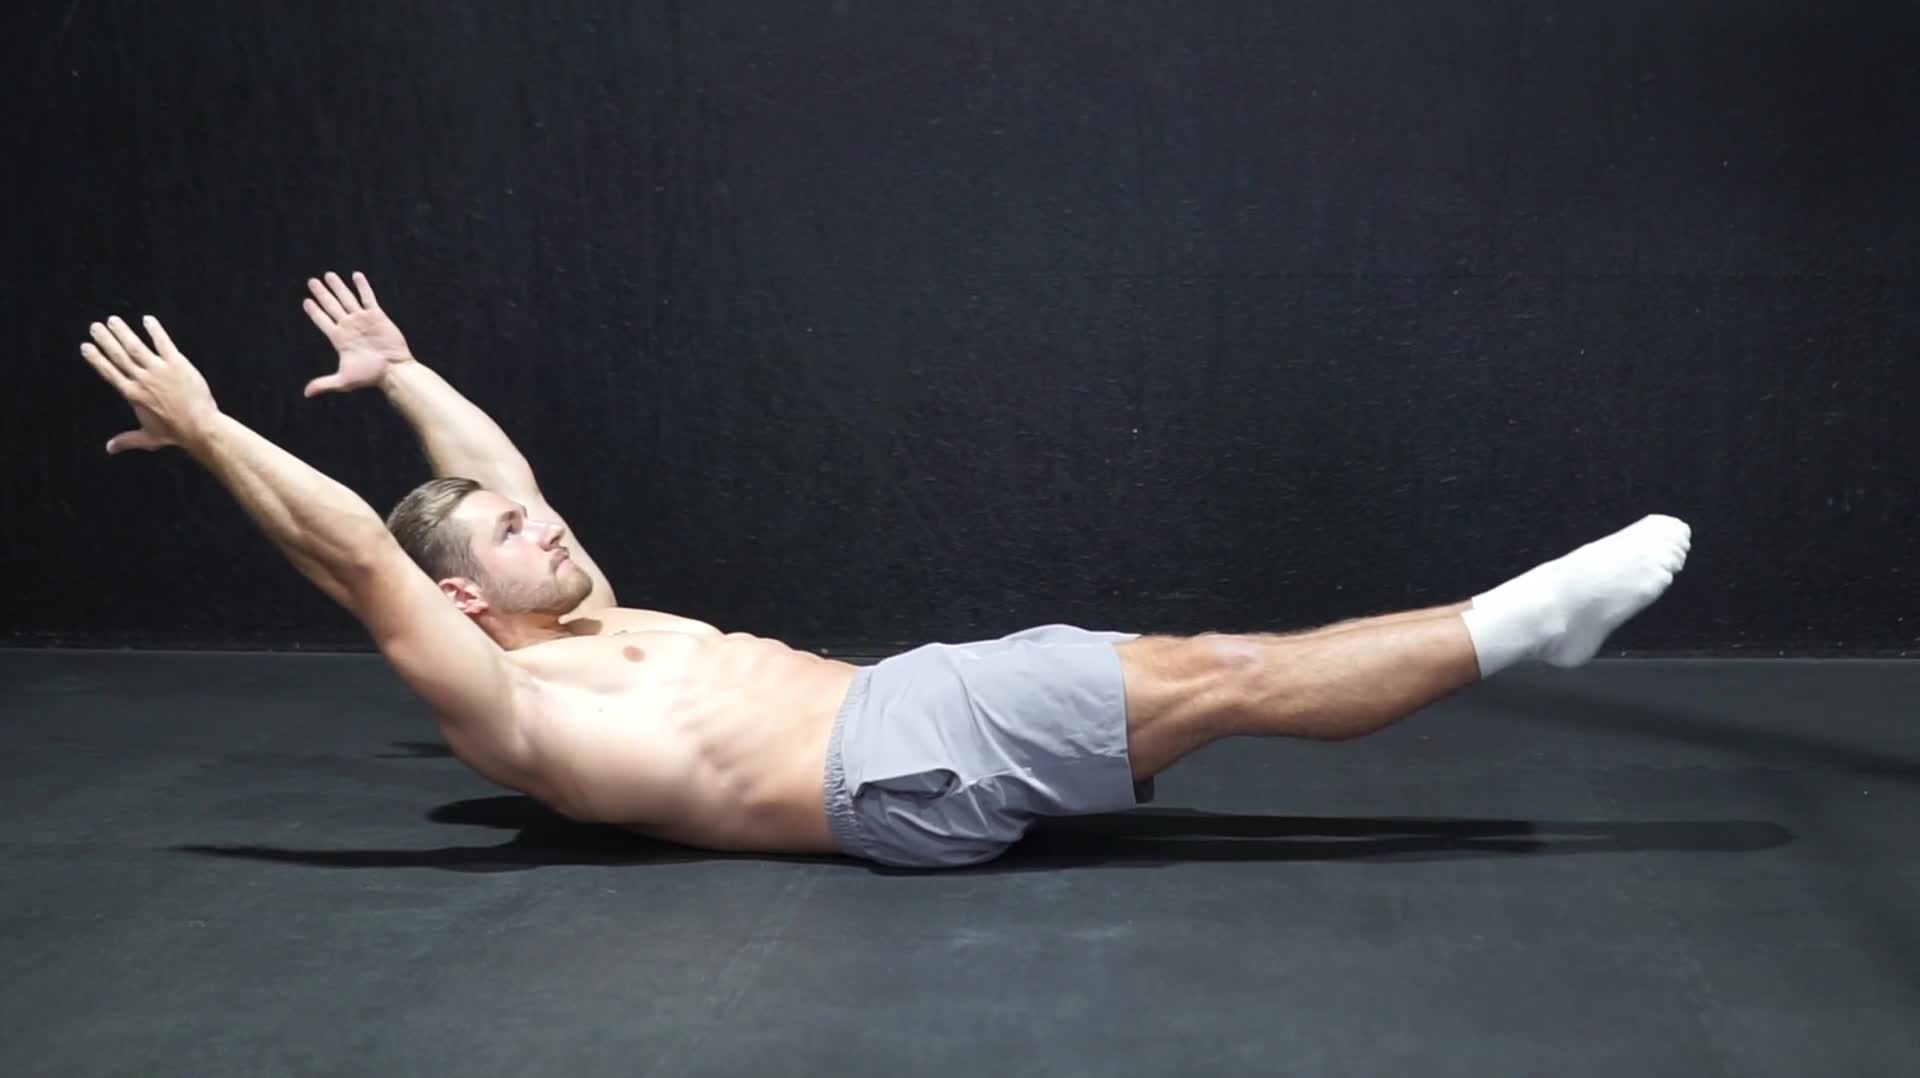
Progresje hollow body
Połóż się na plecach z rękami wyciągniętymi za głowę i wyprostowanymi nogami. Mocno dociśnij odcinek lędźwiowy do podłoża: między plecami a podłogą nie może być prześwitu
Wrist and Shoulder Prep: Your Planche Warm-Up
Your wrists often decide how long you can train the planche at all. In the lean they carry your bodyweight in deep extension, and according to The Movement Athlete most wrist issues in planche training trace back to inadequate preparation. Plan 8 to 10 minutes of warm-up before every session.
- Circle your wrists 10 times in each direction (wrist circles).
- Lean over your hands on all fours: 10 to 15 slow reps with your fingers pointing forward, then sideways, then toward your knees.

Przechyły na nadgarstkach
- Load the backs of your hands with 10 slow reps of reverse wrist leans.

Odwrotne przechyły na nadgarstkach
- Wake up your front shoulders with 2 sets of 15 banded front raises.

Unoszenia ramion w przód z gumą
- Hold the planche plank twice for 20 seconds, pushing your shoulder blades as far apart as possible and your shoulders down toward your hips.
- Ramp in with 1 to 2 easy sets of your lightest working stage.
For hand position, turn your fingers about 45 degrees outward to take pressure off your wrists. Parallettes are even friendlier because they keep your wrists neutral. On rest days, gentle wrist flexor and wrist extensor stretches pay off. For more shoulder and wrist drills, see the guide to handstand mobility.
Follow one clear pain rule: a stretching sensation is fine, a sharp pain is not. Reduce the lean immediately or end the session. If the pain lasts several days, have it checked by a doctor or physiotherapist.
The Complete Planche Progression, Step by Step
You do not train the planche on a single ladder but on three parallel tracks. That is how the planche journey in the Simple Calisthenics app is built, and the stage names below are exactly the names you meet there.
| Track | Starts with | Replaced by | Purpose |
|---|---|---|---|
| 1. Holding | Pseudo Planche Progressions | Planche Progressions | Lean and holding strength |
| 2. Straight-arm pressing | Planche Raise Progressions | Planche Press Progressions | Strength through the whole path into the position |
| 3. Bent-arm pressing | Push Up Progressions | Planche Push Up Progression | Muscle and volume |
How to read the tables: the rules for moving up
The "Move up when" column gives benchmarks, not hard limits. Sources disagree widely: The Movement Athlete works with a 10-second rule, FitnessVolt asks for a 30-second tuck planche. The targets here stay close to the 10-second rule and follow four rules:
- Floor: Hold your current stage for at least 5 clean seconds before you count it at all. Clean means hollow body, shoulder blades pushed apart and elbows locked.
- All sets: Hit the target in all three sets, not just the first.
- Video check: Film yourself from the side. If your back arches or your elbows bend, the stage is still too hard.
- Bands: A resistance band at your hips can help if it pulls straight up and lifts you only 1 to 3 stages above your unassisted level.
Track 1a: The pseudo planche as the foundation
The pseudo planche teaches you the lean while your feet stay on the floor. It is the most important preparatory exercise because it loads your shoulders and wrists at exactly the angle the real planche demands.
| Stage | Position | Move up when |
|---|---|---|
| 1. Planche Plank | Push-up position, shoulders just ahead of the wrists | 3 × 30 s |
| 2. Pseudo Planche Half Lean | Shoulders about halfway past the wrists | 3 × 20-30 s |
| 3. Pseudo Planche Lean | Maximum lean, toes barely touching the floor | 3 × 20-30 s |
| 4. Elevated Pseudo Planche Lean | Feet on a box or bench, same lean | 3 × 15-20 s |

Progresje pseudo planche
Ułóż dłonie na szerokość barków, palce obrócone na zewnątrz o około 45° dla komfortu nadgarstków (albo użyj poręczy). Pochyl się do przodu z pozycji deski, przesuwając barki poza nadgarstki
Track 1b: The eight planche hold stages
From here on your feet leave the floor. The eight stages open your hips first and then your legs until your body forms a straight line.
| Stage | Position | Move up when |
|---|---|---|
| 1. Tucked Planche | Knees tight to the chest, hips at or slightly above shoulder height | 3 × 8-10 s |
| 2. Adv. Tucked Planche | Hip angle more open, back approaching horizontal | 3 × 8-10 s |
| 3. Super Adv. Tucked Planche | Hips extended further, knees further from the chest | 3 × 6-8 s |
| 4. One Leg Planche | One leg straight at hip height, the other tucked | 3 × 6-8 s per side |
| 5. Pike Straddle Planche | Legs wide apart, hips piked at about 90 degrees | 3 × 5-8 s |
| 6. Straddle Planche | Legs straddled and straight, body horizontal | 3 × 5 s |
| 7. Almost Full Planche | The straddle closes toward legs together | 3 × 5 s |
| 8. Full Planche | Legs together, body fully horizontal | Goal: 5 s and more |
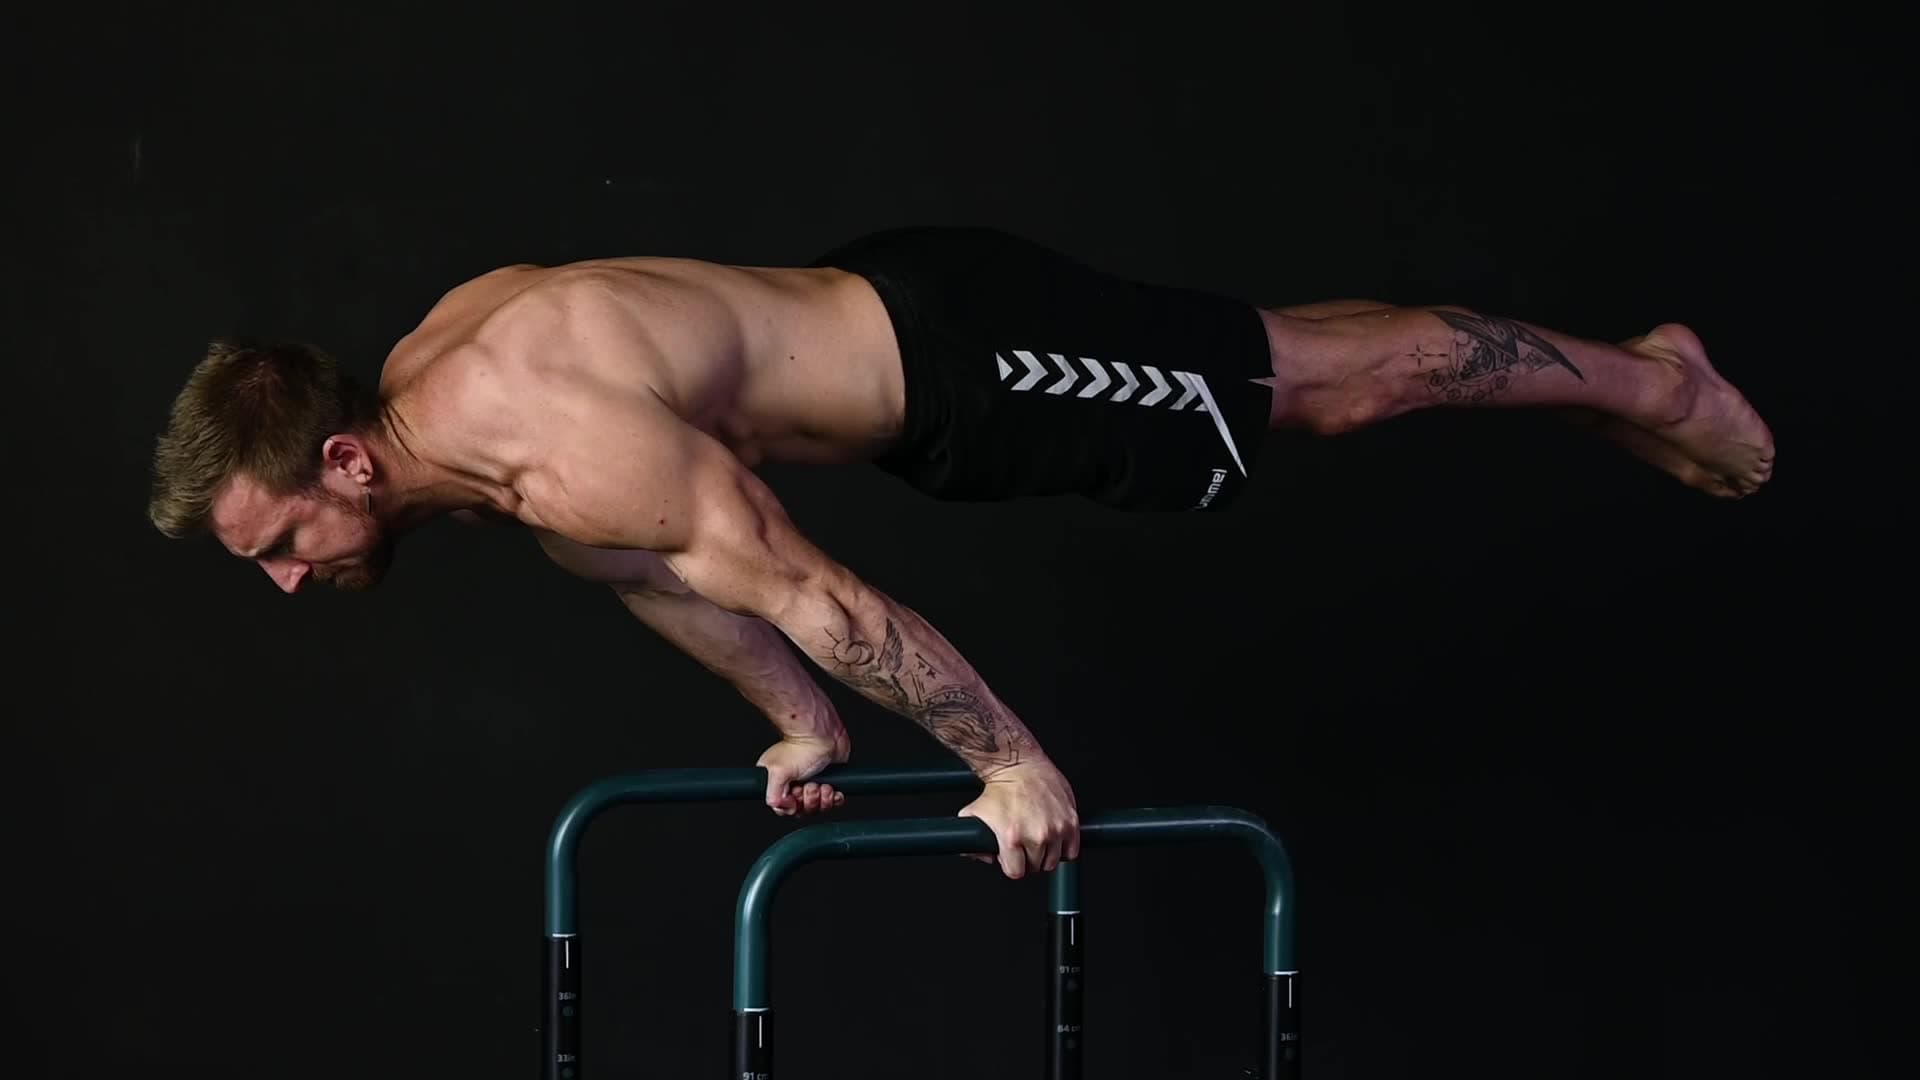
Progresje planche
Ułóż dłonie na szerokość barków, palce obrócone na zewnątrz o około 45° dla komfortu nadgarstków (albo użyj poręczy). Całkowicie zablokuj łokcie i obróć je do przodu: to stabilizuje barki i angażuje bicepsy
The frog stand shows up as the first stage in many guides, but it is not part of this track. It trains balance on your hands with bent arms and your knees resting on your elbows, so it does not build the straight-arm lean. It is still useful for getting used to lifting your feet.

Progresje pozycji żaby
Ułóż dłonie na podłodze, nieco szerzej niż na szerokość barków. Szeroko rozłóż palce, żeby mieć stabilną podstawę
Track 2: Planche raises and planche presses
This track builds straight-arm strength through the whole path into the position. Planche raises start on the floor and lift you into the planche position with straight arms, in five stages: Pseudo Planche Press, Elevated Pseudo Planche Press, SL Elevated Pseudo Planche Press (single leg), Tuck Planche Raise and Adv. Tuck Planche Raise.

Progresje planche raise
Zacznij w leżeniu na podłodze albo w swojej pozycji progresji planche. Trzymaj ramiona całkowicie proste i zablokowane: to ćwiczenie dźwigniowe na prostych ramionach
The planche press starts in the position, lowers you with straight arms over about 3 seconds until your chest touches the floor, and presses you back up. The negative variations train only the lowering. The nine stages: Tuck Planche Press, Negative Adv. Tuck Planche Press, Adv. Tuck Planche Press, Negative Super Adv. Tuck Planche Press, Super Adv. Tuck Planche Press, Negative Straddle Planche Press, Straddle Planche Press, Negative Planche Press and Planche Press.
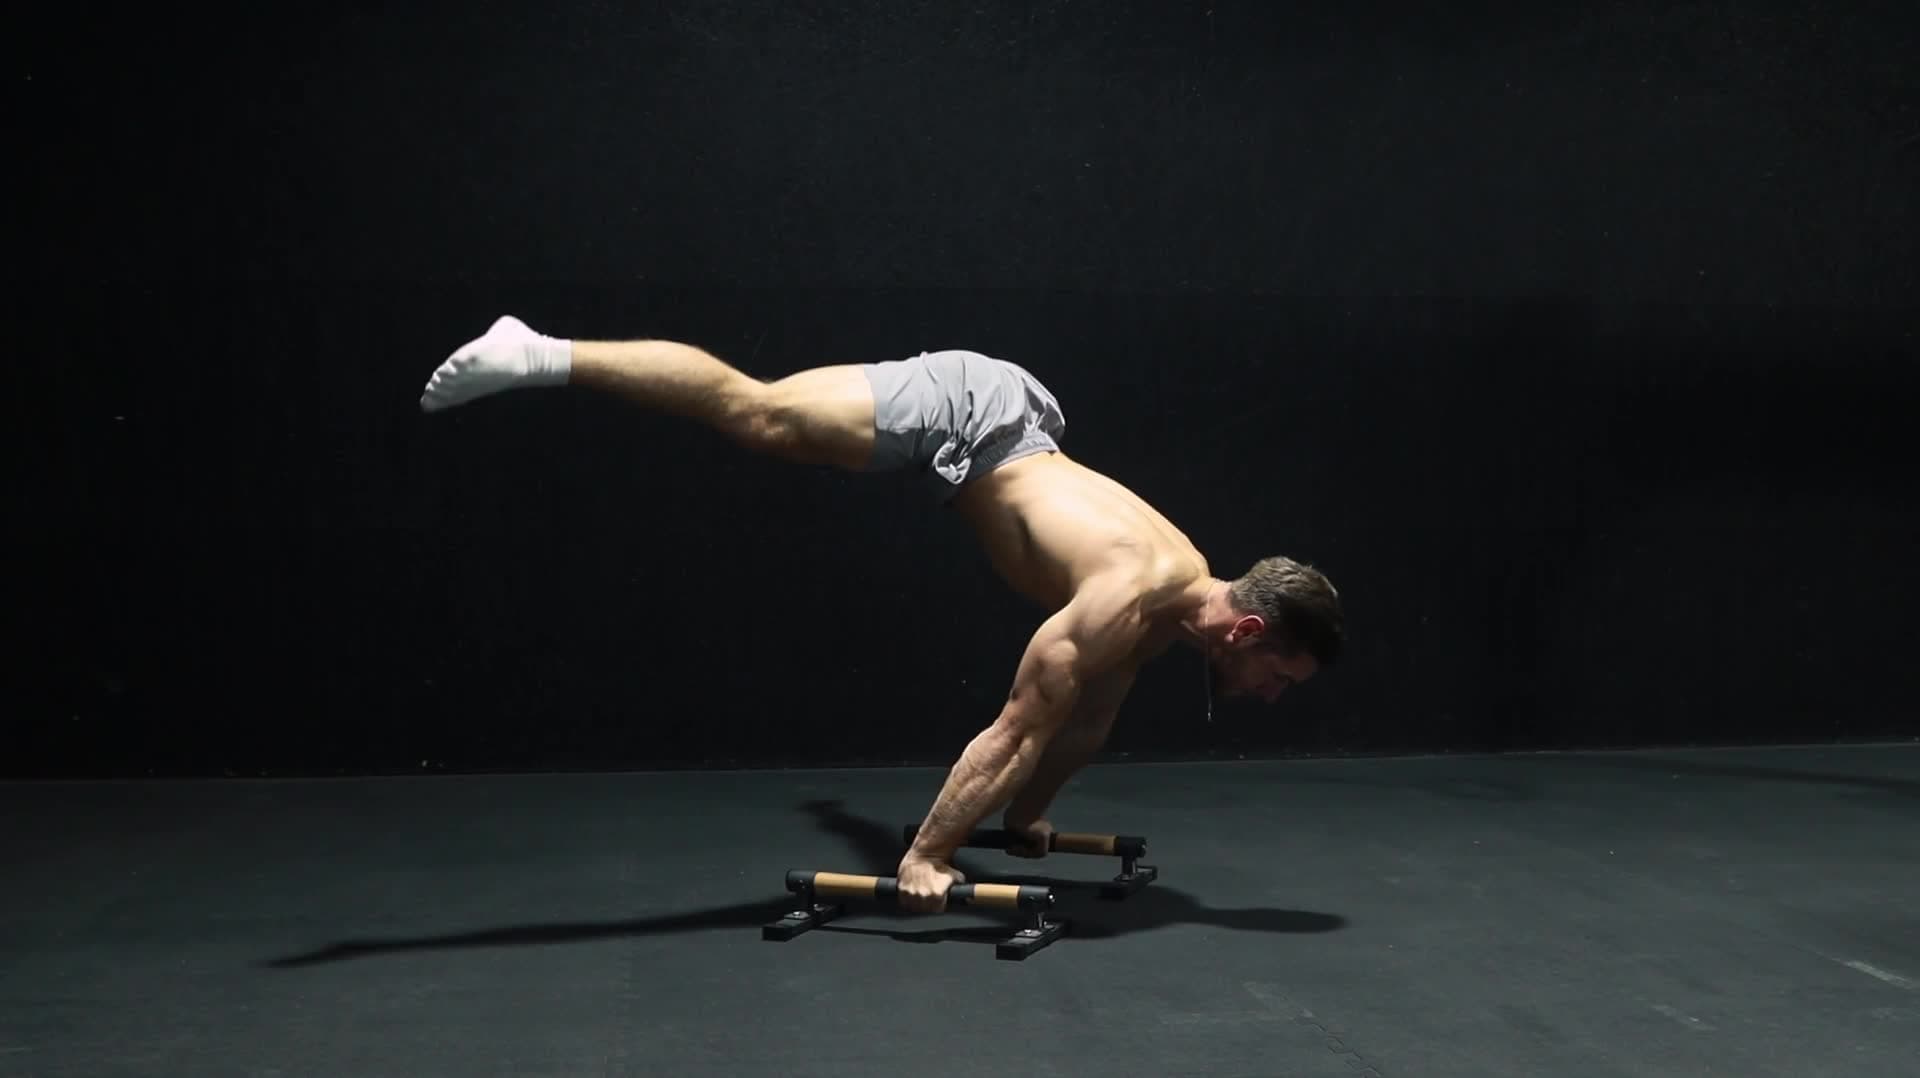
Progresje planche press
Zacznij od swojej progresji planche (podkurcz, zaawansowany podkurcz, rozkrok i tak dalej). Trzymaj ramiona całkowicie proste i zablokowane: to ruch dźwigniowy, a nie pompka
Move up when you manage 3 sets of 5 to 6 clean reps. For the negative variations, 3 sets of 3 to 5 reps are enough if every descent takes at least 3 seconds.
Track 3: Planche push-ups
Planche push-ups are bent-arm push-ups in a planche lean. They build muscle in your shoulders and chest and provide the volume that pure holds cannot. You start with Pseudo Planche Push Ups and Elevated Pseudo Planche Push Ups, where your feet stay on the floor. After that, each body position comes first as a negative and then as a full rep: Negative Tucked Planche Push Ups, Tucked Planche Push Ups, Negative Adv. Tucked Planche Push Ups, Adv. Tucked Planche Push Ups, Negative Super Adv. Tucked Planche Push Ups, Super Adv. Tucked Planche Push Ups, Negative Straddle Planche Push Ups, Straddle Planche Push Ups, Negative Planche Push Ups and finally Planche Push Ups.

Progresje pompek w planche
Zacznij w pozycji planche z dłońmi nieco szerzej niż barki. Odepchnij się dłońmi i oderwij stopy od podłogi, trzymając ciało poziomo
Build the pseudo variations to 3 sets of 8 to 10 reps, every variation with your feet off the floor to 3 sets of 5 to 6, and the negatives to 3 sets of 3 to 5 controlled descents. From the tucked planche push-ups on, use parallettes or bars so you can lower deep enough.
How to Program Your Planche Training: A Weekly Plan
Train the planche two to three times per week with at least 48 hours between sessions. The Movement Athlete recommends 48 hours or more, and according to FitnessVolt, GMB suggests three days a week at most. Straight-arm work loads the biceps tendon and wrists hard, and that tissue needs the break.
Every session follows the same order:
- Warm-up: 8 to 10 minutes of wrist and shoulder prep as above.
- Holds first: 5 to 8 sets of your current Track 1 stage, 5 to 10 seconds each in the tuck range or 15 to 30 seconds for the pseudo planche, with 2 to 3 minutes of rest.
- Pressing next: 3 to 5 sets from Track 2 or Track 3.
- Core last: 2 to 3 sets of hollow body holds.
The same split appears in the form cues of the planche progressions. Here is an example of a three-day week:
| Day | Focus | Content |
|---|---|---|
| Monday | Holds and straight arms | Warm-up, 6 sets Track 1, 4 sets planche raise or planche press, 2 sets hollow body |
| Wednesday | Holds and bent arms | Warm-up, 6 sets Track 1, 4 sets planche push-ups, 3 sets rows or pull-ups |
| Friday | Technique and volume | Warm-up, 5 sets of the next easier stage with longer holds, 3 sets pseudo planche push-ups, 3 sets rows |
| Other days | Recovery | Rest or light wrist and shoulder mobility |
Always put the planche at the start of your session while you are fresh. Balance all that pushing with pulling work such as rows and pull-ups to keep your shoulders in balance. If you also want to learn a lever, the back lever progression is the natural counterpart. Count it toward your straight-arm days so your elbows and tendons are not overloaded.
Common Planche Mistakes (and How to Fix Them)
Most planche mistakes share one cause: the stage is too hard, and your body compensates. These seven come up most often, each with a direct fix.
Bent elbows. With bent arms you do not build the tendon strength the planche needs. Fix: lock your elbows, tighten your triceps and rotate the elbow crease forward, as if screwing your hands outward into the floor. If you cannot, go back one stage.
Sagging hips and an arched back. A banana-shaped back means you are not yet strong enough for the current stage. Fix: choose an easier stage, squeeze your glutes and tuck your tailbone under. Practice hollow body holds until the tension is automatic.
Pinched shoulder blades. Without protraction you lose the rounded upper back that supports the position. Fix: push the floor away and spread your shoulder blades. Perfect protraction under load is not required: a mix of protracted and neutral is enough, as long as the blades never pinch together.
Not enough lean. Trying to lift your body with back and hip strength instead of leaning forward makes the position impossible to hold. Fix: bring your shoulders far ahead of your wrists and train the lean with pseudo planche leans. The straighter your legs, the more lean you need.
Unprepared wrists. Training without a warm-up quickly leads to chronic wrist pain. Fix: do the warm-up above before every session, turn your fingers about 45 degrees outward or use parallettes, and build the load over months.
Moving up too fast. Skipping stages builds bad form habits and risks injury. Fix: respect the 5-clean-seconds floor and move up only when all three sets hit the target.
A band pulling at an angle. A band that pulls diagonally pushes you forward or back instead of carrying bodyweight. Fix: attach the band at your hips and hang it so it pulls straight up.
How Long Does It Take to Learn the Planche?
Think in months for the first stages and in years for the full position. The ranges below are typical values from the training literature, not a guarantee:
- Tuck planche: 3 to 6 months of consistent training, according to The Movement Athlete.
- Full planche: 1 to 3 years according to The Movement Athlete. Daniel Hristov writes that it takes most people well over a year of consistent work, and the r/bodyweightfitness wiki, as quoted by FitnessVolt, puts a good planche at a couple of years for most people.
- Never at the top: GMB notes that most people never reach a full planche. That makes the tuck planche a worthwhile goal on its own.
How fast you progress depends mainly on three factors: your proportions and bodyweight, your starting pushing strength, and how consistently you train. Tendons and connective tissue are usually the slowest part, which is why you often feel stronger than your elbows and wrists actually are.
The biggest jump in the progression sits between the advanced tuck and the straddle. Sondre Berg of Berg Movement writes that most trainees should not go straight from the advanced tuck planche to the straddle planche. That is exactly what the in-between stages Super Adv. Tucked Planche, One Leg Planche and Pike Straddle Planche are for. If you are stuck, check your lean, protraction and hip position on video before you simply pile on more hold time.
Which App Shows You the Right Planche Progression Steps?
Simple Calisthenics shows you every planche difficulty level in the right order, from the pseudo planche to the full planche, and suggests the next stage as soon as your logged sets show you are ready. The stages in this guide are the same ones you find in the app, and every exercise comes with progressions and form guidance.
This is how Simple Calisthenics moves you from one stage to the next:
- Pick the planche as your target skill. In the questionnaire you set your goals, equipment, current strength level and training days. That becomes your personal program, and you can pursue several skills at once. More on this in the workout plan generator.
- Start at your level. The questionnaire sets your starting point, so you begin with exercises you can actually perform.
- Train the tracks in parallel. Every skill journey combines complementary tracks. For the planche these are the three tracks from this guide: pseudo planche and planche holds, planche raises and planche presses, push-ups and planche push-ups.
- Follow the targets in your workout. The workout player recommends a target for every set. It builds on the best of your last three sessions within the last four weeks, so one bad day does not lower your targets. When the app recommends a progression change, a "Progress" or "Regress" button appears next to the recommendation.
- Unlock the next exercise. Your progress toward the conditions is tracked automatically from your training, with nothing to configure. When the conditions are met, a card on your personal program suggests the upgrade. You can preview exactly what changes, apply it or dismiss it, and reverse an applied upgrade at any time.
For every skill, the journey on your personal program page shows which exercises you are training now, which steps come next and how far along you are on the conditions. The calisthenics skill tree page explains how skill journeys are built. On top of that, the program alternates hypertrophy, strength and deload blocks and adapts to your equipment, from no equipment at all to a full gym. Every subscription plan includes a free trial: try Simple Calisthenics free.
Frequently asked questions
How long does it take to learn the planche?
According to The Movement Athlete, people who train consistently typically reach the tuck planche in 3 to 6 months and the full planche in 1 to 3 years. These are typical ranges, not a guarantee: proportions, body weight and starting strength shift them a lot. Many people never reach the full planche, and the tuck planche is a worthwhile goal on its own.
Which app shows me the right difficulty levels for the planche?
Simple Calisthenics shows every planche step in a fixed order, from the pseudo planche to the full planche, and tracks your progress automatically from your logged sets. When the conditions for the next step are met, the app suggests the upgrade. You can apply it, dismiss it or reverse it later.
How many push-ups do I need for the planche?
A good entry mark is 20 strict push-ups in a row, the standard FitnessVolt uses, plus a 30-second hollow body hold without arching. You can still start with fewer: the planche plank and pseudo planche half lean are easy enough, and your push-up progression keeps running alongside.
Can I learn the planche at home without equipment?
Yes. Every hold stage works on the floor, and a bench or sturdy box covers the elevated variations. Parallettes are optional, but they allow a neutral grip that takes pressure off your wrists. For planche push-ups, parallettes or dip bars help because they let you lower deeper.
How often should I train the planche each week?
Two to three sessions per week with at least 48 hours between them. Straight-arm work loads tendons and wrists heavily, and tendons adapt more slowly than muscles. GMB recommends three days a week at most. Put the planche at the start of your session while you are fresh.
Learn the planche one step at a time: Simple Calisthenics shows you every progression in the right order and suggests the next step as soon as you are ready.
Wypróbuj za darmoFAQ
- How long does it take to learn the planche?
- According to The Movement Athlete, people who train consistently typically reach the tuck planche in 3 to 6 months and the full planche in 1 to 3 years. These are typical ranges, not a guarantee: proportions, body weight and starting strength shift them a lot. Many people never reach the full planche, and the tuck planche is a worthwhile goal on its own.
- Which app shows me the right difficulty levels for the planche?
- Simple Calisthenics shows every planche step in a fixed order, from the pseudo planche to the full planche, and tracks your progress automatically from your logged sets. When the conditions for the next step are met, the app suggests the upgrade. You can apply it, dismiss it or reverse it later.
- How many push-ups do I need for the planche?
- A good entry mark is 20 strict push-ups in a row, the standard FitnessVolt uses, plus a 30-second hollow body hold without arching. You can still start with fewer: the planche plank and pseudo planche half lean are easy enough, and your push-up progression keeps running alongside.
- Can I learn the planche at home without equipment?
- Yes. Every hold stage works on the floor, and a bench or sturdy box covers the elevated variations. Parallettes are optional, but they allow a neutral grip that takes pressure off your wrists. For planche push-ups, parallettes or dip bars help because they let you lower deeper.
- How often should I train the planche each week?
- Two to three sessions per week with at least 48 hours between them. Straight-arm work loads tendons and wrists heavily, and tendons adapt more slowly than muscles. GMB recommends three days a week at most. Put the planche at the start of your session while you are fresh.